
Showing posts with label desserts. Show all posts

Wednesday, May 6, 2015

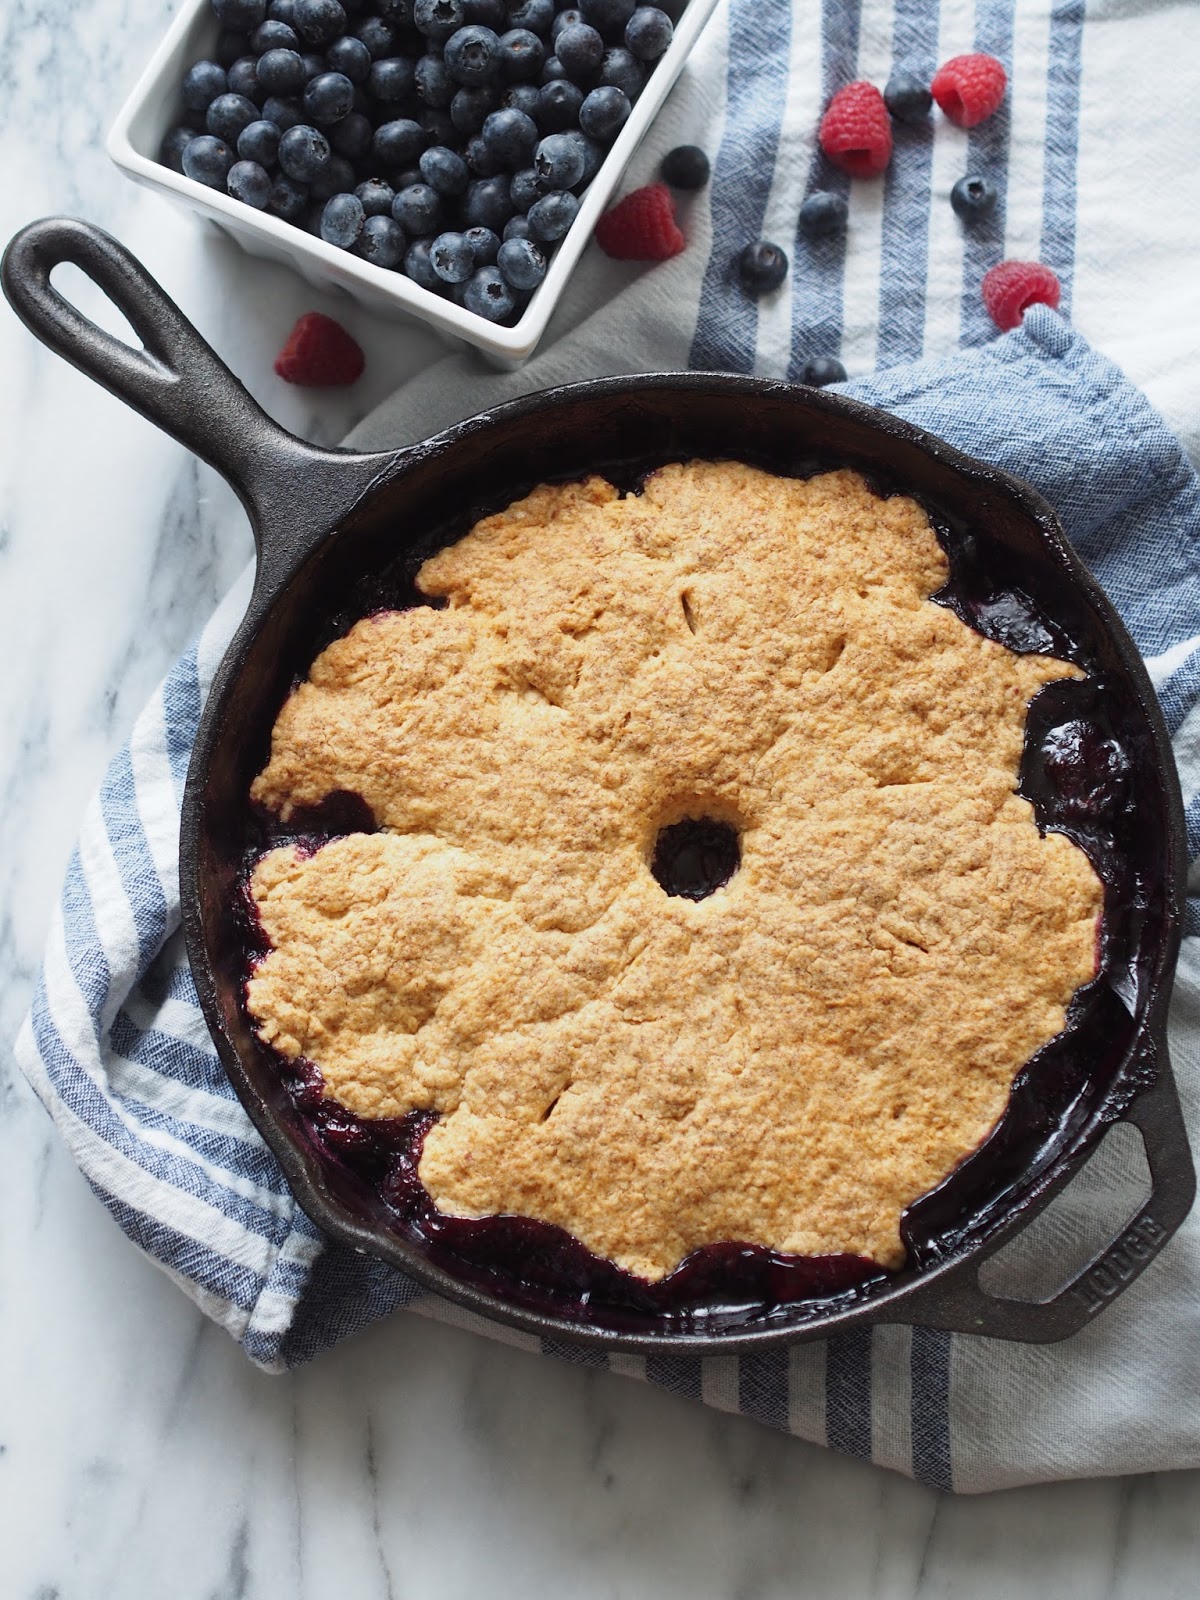
Mixed Berry Cobbler With Biscuit Topping

Who's ready for a little mixed berry cobbler?  Since we're coming into the start of berry season fairly soon, I thought it would be nice to share with you all one of my best cobbler recipes.  The nice thing about this recipe is that you can really play around with your portions of berries, and basically use any variety that you'd like {just go easy on the strawberries, they tend to be a little too watery for this type of biscuit topping}.  No fresh berries in your area yet?  This recipe works well with frozen berries as well, and no need to defrost them beforehand either.

And can we talk about that topping for a sec?  It's a sweet biscuit, that is beyond easy to construct and always turns out perfectly imperfect; golden brown, with cracks from where the berries ooze up on the sides.  Very homey & rustic looking.  Just the way I like my desserts!

When my family was visiting me recently, I cooked a really nice dinner full of homestyle favorites, and we had also invited Adams father over for dinner.  He happens to love blueberries, so I doubled the amount of blueberries in this recipe.  The result was great, but all of our teeth were stained purplish blue for hours afterwards!  We all thought it was pretty funny and had a good laugh, but definitely something to keep in mind if you're cooking this for a dinner party...

** For this recipe, you will need a 10" cast iron skillet.  You can purchase a fancy one, but I've found that I like Lodge skillets the best.  They hold up amazingly well, and are very inexpensive!  View it here.**


Ingredients


2 cups all purpose flour {I've also made this with whole wheat flour, and it turns out great so feel free to substitute}
1 tbsp. baking powder
7 tbsp. sugar, divided
1/2 tsp. salt
6 tbsp. cold unsalted butter, cut into tiny chunks
3/4 cup cold heavy cream
3 cups blueberries, rinsed
1 cup blackberries, rinsed
1 cup raspberries, rinsed
1 tbsp. cornstarch
grated zest of 1 lemon
vanilla ice cream or whipped topping for serving


Directions


Preheat oven to 375 degrees F.  Butter a 10" cast iron skillet, and place it on a baking sheet lined with parchment paper.

In a large bowl, whisk together  the flour, baking powder, 3 tbsp of the sugar, and salt.  Place dry ingredients in a food processor, add in the butter chunks, and pulse until the mixture resembles coarse sand.  

Remove from processor, place back in your large bowl, and add in the heavy cream.  Gently turn the ingredients, until a very soft dough forms.  Use your hands to knead the dough until it's evenly blended {it should be soft and sticky}.

Place the dough in between two sheets of plastic wrap, and gently roll it out into a circle until that is roughly 10" in diameter.  Don't worry if your edges are uneven or if the size isn't exactly right, this is a very rustic looking dessert and any imperfections just add to its charm.  Set dough aside.

Next, in a large bowl, toss together your berries, the remaining 4 tbsp of sugar, cornstarch, and lemon zest.  Dump the berry mixture into your buttered skillet, and place your rolled out biscuit dough on top of the berries.  Using a small knife, pierce 6-8 slits in the dough {just as you would a pie crust}, and cut out a small center in the middle of the dough.  This allows for proper ventilation and aids in the cooking process.

Place the cobbler in the oven, and bake for 50-60 minutes, or until the top is golden brown and the fruit it bubbling up through the center, and around the sides of the biscuit.  Transfer the skillet to a rack, and let cool for about 30 minutes before serving.

Serve warm, or at room temperature with a dollop of ice cream or whipped topping.


You might notice that I have 2 different towels in my pictures.  We were such eager fat kids when I made this that I forgot to take a picture before we sliced into it!  Thank goodness I had an older picture to use :)


I really hope you enjoy this recipe!  Please let me know if you end up making it, and if you have any feedback leave your comment at the bottom of this page.  I love hearing from you guys! xx

Monday, April 20, 2015

Blackberry and Peach Crostata

Welcome back from the weekend, friends!  I have a great recipe to share with you guys today.  This was a HUGE craving of mine a couple weeks back, but we were smack dab in the middle of Passover.  During the 8 days of Passover, we don't eat any wheat products {technically, nothing that can "rise", so only unleavened products for that time frame}, and I was absolutely dying for this crostata.  I'm talking dreaming of it, salivating at the mouth cravings!  The day after the holiday ended, I was up and at 'em bright and early, on my way to the grocery store to buy all the necessary ingredients to make this yummy dessert.  1 week is a long time to wait for a pregnancy craving lol!

If you've never had a crostata before, it's basically the Italians version of a pie.  I love crostata, and always seek out a good slice whenever we vacation in Italy.  Crostata is a little more rustic, peasant food style, and usually is constructed with whatever fresh fruit is in season.  The top isn't enclosed with crust like a regular pie is, instead the dough just folds over the fruit, and leaves the middle partially exposed making for a beautiful presentation.  I love that the fruit really is the shining star in this recipe.  Minimal sugar is added allowing the natural sweetness from the peaches & blackberries to really stand out.

As I've said in the past, a great majority of the recipes that I post on here are my own, however whenever I come across an amazing recipe that belongs to someone else I have to share it with you guys!  I originally saw this recipe on The Chew.  Do you ever watch that show?  It's sort of like The View but for foodies {during the day, food/cooking channels are always on in the background of my house}, so this recipe actually comes courtesy of Mario Batali.  It's SO GOOD you guys!  I really hope that you try it out! 

* As a small side note, for this recipe you will need an 11" tart pan with a removable bottom.  I purchased mine from Williams-Sonoma years ago, and it's held up great!  You can get it here. *


Ingredients


2 1/2 cup cake flour, plus more for dusting
3 tablespoons sugar
1/2 teaspoon salt
Grated zest of 1 Lemon
1 cup {2 sticks} cold unsalted Butter, cut into small chunks
1/4 cup ice water plus more if needed
6 large ripe peaches, pitted & sliced
2 pints fresh blackberries
Juice of 1 lemon
3 tablespoons sugar
1 tablespoon all-purpose Flour
2 tablespoons honey
large egg, at room temperature
1 cup mascarpone or freshly whipped cream if desired


Directions


Combine the flour, sugar, salt, and lemon zest in a food processor.  Add the butter and zap quickly until the mixture resembles coarse crumbs.  Next, add the ice water, 1 tablespoon at a time, and pulse until the dough just forms a ball without being too wet or sticky.

Remove the dough from the processor and pat it into a flat disk, about 2 inches thick.  Wrap it into plastic wrap and refrigerate for at least 30 minutes.

Meanwhile, combine the peaches, blackberries, lemon juice, sugar, and flour in a large mixing bowl.  Toss the mixture gently to coat the fruit.

Next, preheat your oven to 365 degrees F. 

Remove the dough from the refrigerator and allow it to barely soften enough to roll out.  This next part is a little tricky, you want the dough to be workable, but if it's too soft it will fall apart when you transfer it to your tart pan, so you need to work quickly.

Sprinkle your work surface and a rolling pin lightly with cake flour.  Roll the dough out into a 16-inch round, about 1/4 inch thick.  If the dough tears, press the edges back together.  Transfer the dough to a 12 1/2-inch fluted quiche or tart pan with a removable bottom, allowing the excess to hang over the edges.  Spoon the fruit mixture into the dough.  Fold in the overhanging edges of the dough, leaving a 6-inch area of fruit exposed in the center.  Press the crust into the rim of the fluted pan to form an edge. 

Next, place a heatproof bowl over a saucepan of simmering water, and heat the honey in the bowl until it is thin.  Add the egg and whisk them together.  Brush this mixture liberally over the fruit and crust.  

Place the tart pan on a baking sheet, and bake for 1 hour and 10 minutes or until the crust is golden brown and fruit is bubbly. Remove it from the oven and let it cool slightly.

Serve the crostata warm or at room temperature, with a dollop of mascarpone or whipped cream in each serving.


Have a great week! xx

Thursday, November 13, 2014

Triple Layer Pumpkin Cheesecake

Warning!  Since I normally like to post healthy/semi-healthy recipes over here, I feel like I should forewarn you guys that this recipe is not healthy in any form.  It contains real butter, sugar, and lotsa cream cheese, and the full fat version at that.  There are certain occasions that call for a serious case of indulgence, and I'd like to think that Thanksgiving is at the top of my list for these occasions! :)

This is technically a cheesecake, but it's SO much better than regular cheesecake and is a thousand times better than basic pumpkin pie.  Rich, decadent, indulgent, and so freakin' good!  I replaced the standard graham cracker crust with crushed gingersnaps which gives it a nice sweet & slightly spicy base.  The second layer features a thin layer of regular cheesecake, followed by the third layer: pumpkin cheesecake!

I've been making this dessert every Thanksgiving for probably 7 or 8 years, and trust me, it does not fail.  Even weirdos those who proclaim that they don't care for cheesecake will end up inhaling a piece, and everyone will be raving about how good it was for days to come.  Consider this the holy grail of all pumpkin desserts!

As a small side note, for this recipe you will need a 9-inch springform pan.  I purchased mine years ago from Williams-Sonoma and it has held up great!  For purchasing info, view here.

Enjoy!


Ingredients

2  10 oz bags of gingersnap cookies
6  tbsp unsalted butter, melted
4  8 oz packages cream cheese, softened to room temperature
1  1/2 c. sugar
4  eggs
1  c. canned pumpkin {not pumpkin pie mix}
1  tsp. ground ginger
1  tsp. ground cinnamon
1/4  tsp. ground nutmeg
Whipped cream for serving


Directions

Pre-heat oven to 300 degrees F.  Grease a 9-inch springform pan with nonstick cooking spray.  Wrap a layer of tin foil around the base of the pan to catch any drippings.  

Using a food processor, pulse gingersnap cookies until they resemble coarse sand.  Measure out 3  1/2 cups and place in a small bowl.  Alternatively, if you don't have a food processor, you can place cookies in a large plastic bag, and pound with a meat tenderizer or rolling pin until crushed.

Combine cookie crumbs with the melted butter.  Firmly press crumb mixture in the bottom of the pan, and about 1 inch up the sides.  Bake for 12-15 minutes or until set.  Set aside to cool.

Next, using a stand mixture or a large bowl with an electric mixer, beat cream cheese on medium speed until smooth and creamy.  Take care not to overbeat.  On low speed, gradually beat in sugar, followed by the eggs one at a time, just until blended.  Spoon 3 cups of the cream cheese mixture into your pan & spread evenly.

Now stir in the pumpkin, ginger, cinnamon, and nutmeg into the remaining cream cheese mixture and mix with a wire whisk until smooth.  Spoon over the cream cheese layer in the pan.

Place in oven on the middle rack and bake for 1 hour 15 minutes or until edges are set but center of cheesecake still jiggles slightly when moved.

Turn oven off, and leave the oven door slightly opened {at least 4 inches}, and leave the cheesecake this way in the oven for 15 minutes longer.  Remove from oven; place on a wire rack.  Do not release the side of the pan yet.  Run a knife around the edge of the pan to loosen the cheesecake.  Cool in the pan on the wire rack for 30 minutes.  Cover loosely, and transfer to the refrigerator to set for a minimum of 6 hours before serving.  The cheesecake may collect a bit of water on the top as it cools in the refrigerator, this is totally normal.  Simply blot with a paper towel before serving.

To serve, run a knife around the edge of the pan again to loosen.  Carefully release the side of the pan, and place cheesecake on a serving platter.  Fill a glass with hot water, and dip a knife into it to warm.  This allows for easier & cleaner slicing.  Serve with a dollop of whipped cream and a sprinkle of cinnamon.


I LOVE to hear back from you when you try out one of my recipes.  So please leave any feedback & comments below.  xx

Monday, September 29, 2014

Spiced Vegan Apple Crisp

It's starting to feel like fall around here....or at least it is inside my home :)  Outside is another {91 degree} story.  When I paid a visit to my local Pottery Barn recently, the sales associate told me that "fall is what we create in our homes" and that couldn't be any more dead on.  I threw together this apple crisp over the weekend, while I burned my favorite pumpkin scented candle.  The ambiance inside my home felt like fall, and that's all that matters.  

This apple crisp is so delicious you guys.  Warm, gooey apples, topped with a crunchy spiced topping, this recipe is so comforting you won't even realize that there's no eggs or butter.  All the feelings of a big ol' helping of apple pie, sans guilt.  Just the way I like to do things around here!

 Leftover apple crisp makes an equally tasty breakfast treat.  Warm it up in the microwave, and serve it with a dollop of Greek yogurt - so scrump!

Hope you enjoy.


Ingredients

6 medium tart cooking apples, such as Granny Smith or Honey Crisp; peeled, cored, and sliced.
3/4 c. packed brown sugar
1/2 c. gluten free white rice flour
1/2 c. old fashioned rolled oats
1 tsp. ground cinnamon
1/4 tsp. ground nutmeg
1/4 c. chopped pecans
1/3 c. coconut oil
Almond milk ice cream, or regular vanilla ice cream if desired


Directions

Preheat oven to 375 degrees.  Spread apples in an ungreased 8 inch square baking dish.

In a medium bowl, combine brown sugar, flour, oats, spices, and nuts.  Place ingredients in a food processor or blender, and add the coconut oil.  Pulse until mixture is crumbly & completely blended.  Sprinkle evenly over apples.

Bake 35 to 40 minutes or until topping is golden brown, and apples are tender.  

Serve warm with a scoop of ice cream.


Have a great week! xx

Wednesday, April 30, 2014

Banana Chocolate Cake In A Cup - Vegan & GF

We've all seen those recipes on Pinterest for 'Individual Mug Cake'.  They've been going around pretty strong for the past year.  I have my own version that I've been making for a couple years now, except I don't have a cutesy name for it like "mug cake".  I call mine cake in a cup, and I used to torment my husband with my best Austin Powers Goldmember impression, "Would you like a cake in a cup?  How about a smoke and a pancake?" :)  Ahhhhhh the joys of being married to me....

Anyhoo, my cake in a cup version is dense, fudgy and full of chocolate, banana, and coconut goodness.  It's super easy to whip up and cooks in approximately 3 minutes!  Oh, and did I mention that it's vegan, gluten, and refined sugar free?  Thank me later girls.  This is your new go-to for those type of days.  :)


Ingredients

4 tbsp white rice flour
2 tbsp sugar substitute {I use Z Sweet}
2 tbsp unsweetened cocoa powder
1/4 tsp baking powder
Dash of cinnamon
1/2 of a ripe banana; mashed
3 tbsp unsweetened apple sauce
3 tbsp almond milk {I use an unsweetened chocolate version from Almond Breeze, but any flavor is fine!}
2 drops vanilla extract
2 tbsp vegan chocolate chips
Large pinch of unsweetened shredded coconut
Almond milk ice cream **optional**


Directions

In a small bowl, combine flour, sugar substitute, cocoa powder, baking powder, and dash of cinnamon.  Set aside.

In another small bowl, combine banana, apple sauce, almond milk, and vanilla extract.  Slowly add in dry ingredients, mixing well to combine.  

Add in chocolate chips, and shredded coconut.  Pour batter into a microwave safe coffee mug, place in the microwave and cook for 3 minutes.

Serve immediately with ice cream on the side.  


How cute are these 'his ice cream & her ice cream' spoons?!  You can find them in the most adorable Etsy ever shop by clicking {here}


Have a great day! xx
 

design + development by kelly christine studio